Brown Sugar Bacon Grissini

Brown Sugar Bacon Grissini

HAPPY NEW YEAR!

Starting off 2021 with one of our favorite appetizers of all time! You are going to love this simple recipe that is sure to wow a crowd wherever you go — and yes, we say a crowd because it’s a new year and we have to believe in the power of positivity!

This appetizier is great for any occasion, only takes 3 ingredients, and is virtually impossible to mess up! You’re going to want to keep this recipe handy the next time you need to bring an app!

Ingredients:

Grissini (thin breadsticks)

1 package regularly sliced bacon

1-2 cups brown sugar

Instructions:

1. Line a baking sheet completely with aluminum foil or parchment paper (this is crucial for ease and clean up).

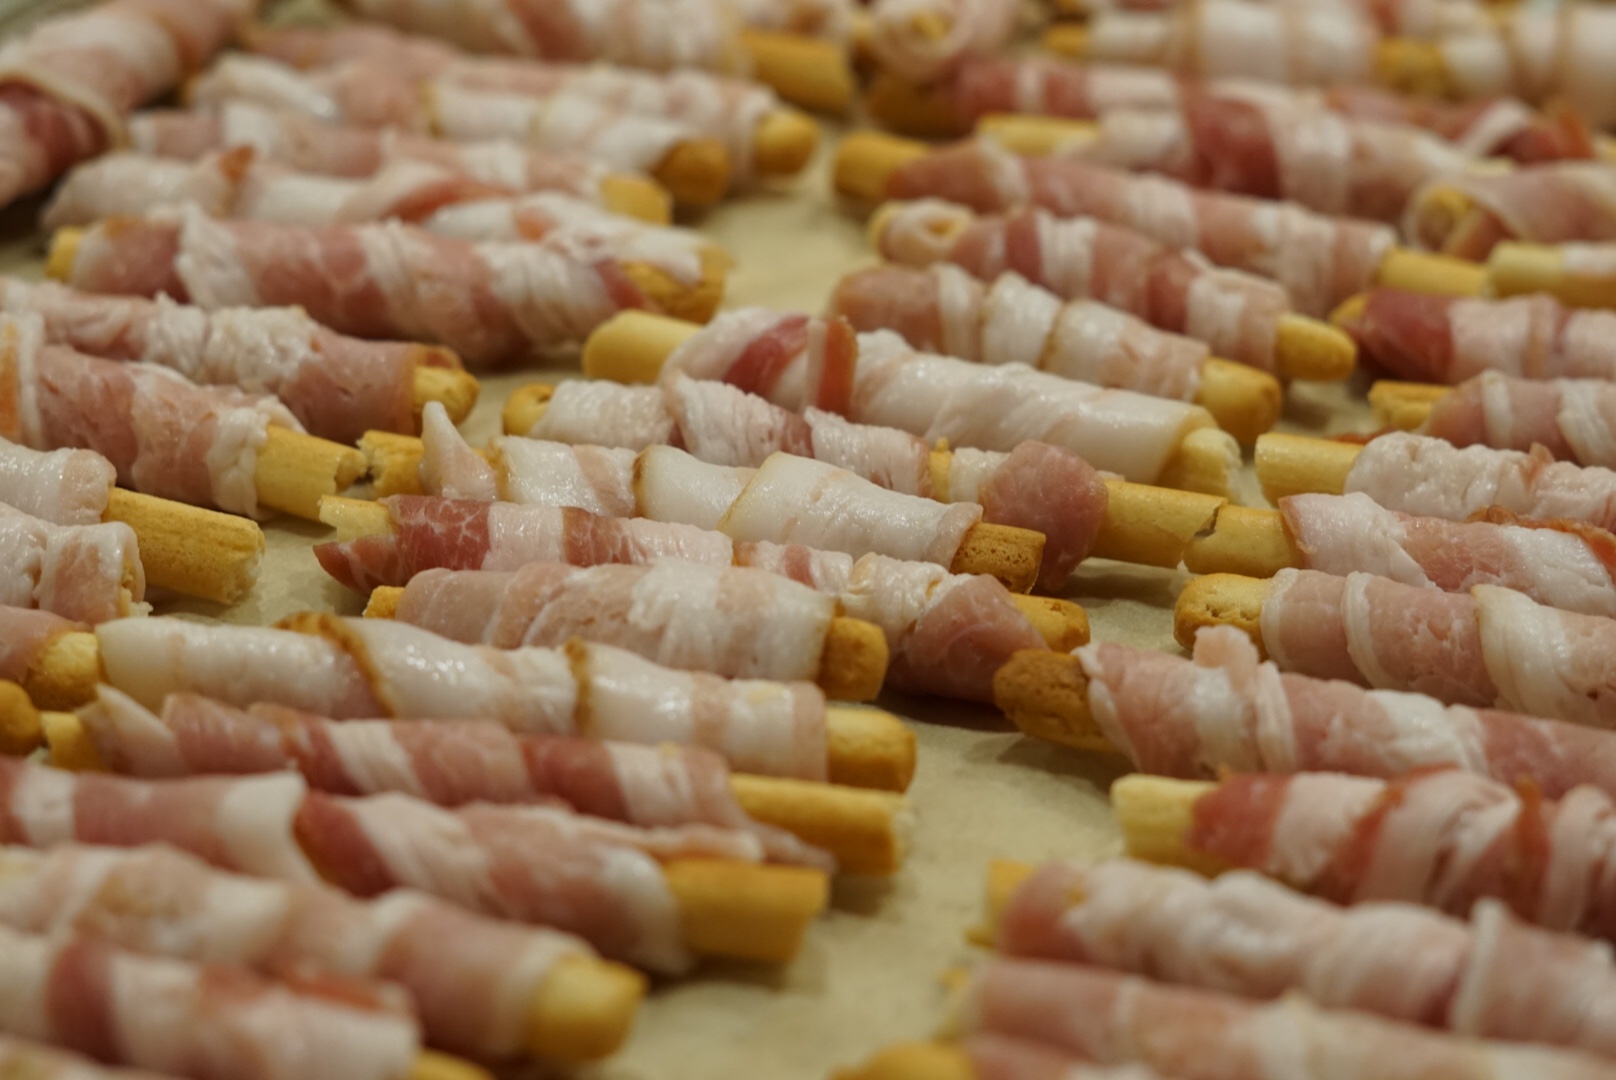
2. Take grissini and break in half so you have pretty uniform sized pieces. Breaking in half is optional, but we find the bite size is better as an app and goes further!

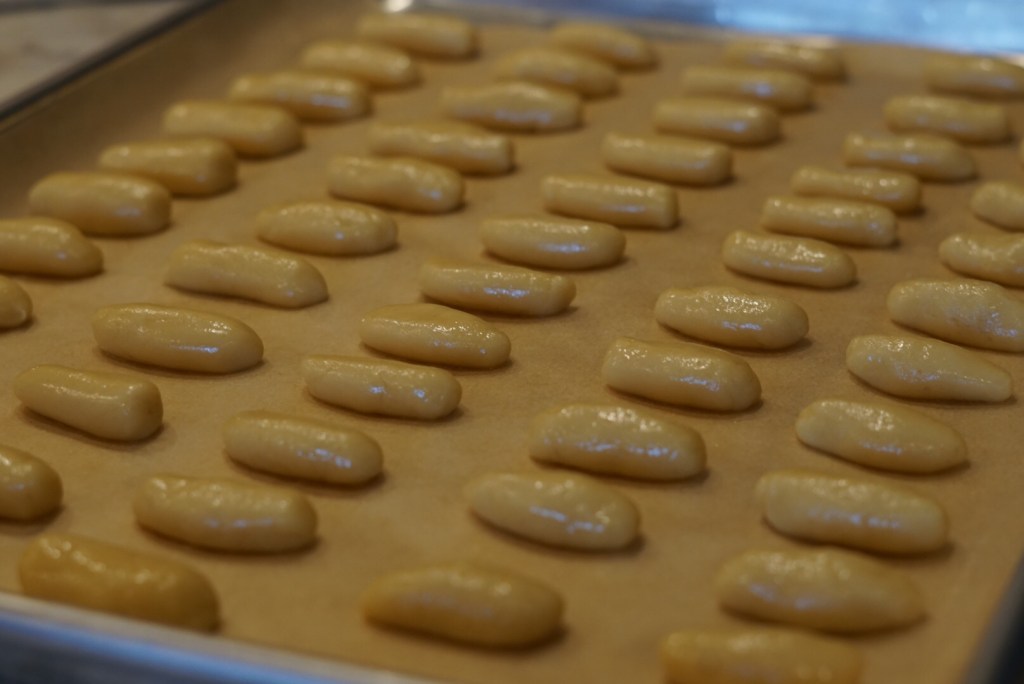
3. Take your bacon and cut in half, and then cut again long-ways — you want pieces of bacon that are almost as long as your grissini and thin. This makes it much easier to wrap the bacon on the grissini and for it to stay!

4. Wrap each grissini in a piece of bacon, going diagonally down so you are covering as much of the grissini as you can!

5. Lay out 1 cup of brown sugar (to start) in a pie dish or plate. Then take each bacon-wrapped grissini and roll in the sugar, pressing lightly to coat the entire stick!

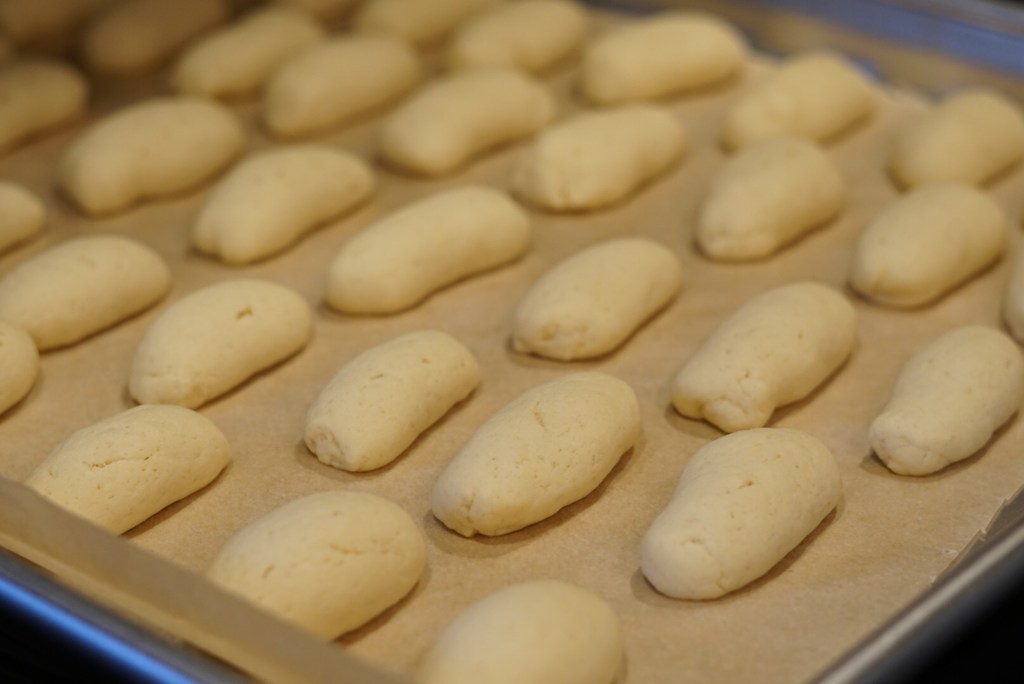
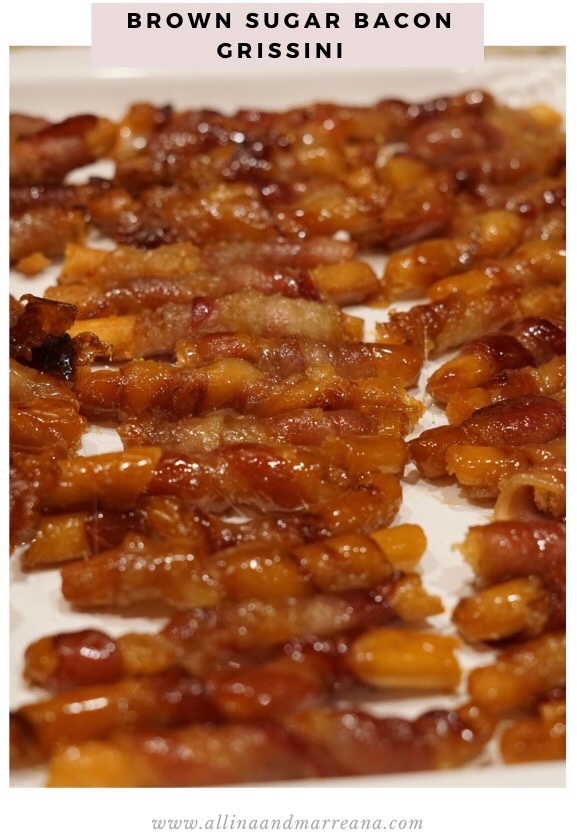
6. Line them up on your sheet and bake at 400° for 15-20 minutes — you want the bacon to get crispy! Check them half way as you may want to roll them a little bit. Do not worry if the brown sugar starts to pool around them; this is normal!

7. Once they are done, take them out, and let them cool *slightly* for a couple of minutes. Take tongs and give them one last roll in all that extra gooey goodness before plating!

*Be careful not to let them cool too much as the sugar will get hard and they will stick!*

8. Serve and enjoy!!!

Keep scrolling to see pictures of the steps to make these!

We also tried them with gluten-free grissini this time and it worked perfectly!

Thanks for reading! Don’t forget to subscribe and follow us on Instagram for more photos and announcements whenever we post something new!

📸: @allinaandmarreana

With love,

Charcuterie Chalet

Charcuterie Chalet

Charcuterie Chalet, Prosciutto Palace, Salami Shack, whatever you want to call it, this house looks amazing and tastes even better!

For the 10th Day of Christmas we decided to do a gingerbread house…with a twist! Instead of a sweet creation, we used our creativity and built this savory house!

We took the base of a gingerbread house and covered it in whipped cream cheese…laying the foundation for us to top it in our favorite charcuterie items. We used salami, soppresata, prosciutto, green and black olives, pomegranate seeds, rosemary and more!

We honestly have to say this was so much fun! We love making an antipasto for every holiday in our house, so this really combined one of our favorite things with a classic holiday trend!

We started with a classic build yourself gingerbread house and covered it in *whipped* cream cheese! The whipped cream cheese was key here as it was lighter and easier to spread!

We created a shiplap front using cheese and finished each side with four triscuits!

Creating our favorite part — the rosemary wreath! Finished with a red and white string bow!

Made this adorable little penguin out of a fresh mozzarella pearl, black olives and a carrot!

We made our roof snow-covered with ricotta and sprinkled with grated cheese!

We hope you try this with your friends and family! Please tag us if you do! 📸: @allinaandmarreana

Don’t forget to subscribe so you don’t miss our last two posts of our 12 Days of Christmas!

With love,

In case you missed it…

Day 1: Wrap It Up

Day 2: O Christmas Tree

Day 3: Hot Cocoa Bombs

Day 4: Perfect Anise Biscotti

Day 5: Baking Spirits Bright

Day 6: Christmas Cocktails

Day 7: Cookie Boxes

Day 8: Get In The Christmas Spirit

Day 9: Winter Wonderland

Baking Spirits Bright

Baking Spirits Bright

One of our favorite holiday traditions is baking all our favorite kinds of christmas cookies and assembling cookie trays for our family gatherings.

This year things are different, and we aren’t able to gather like we usually would… So, this year we spent the week with our mom baking almost 15 different kinds of cookies! We spent the days listening to Christmas music, mixing cookies and baking from morning till night!

This has been such a special bonding experience with our mom that we wouldn’t trade for anything! Keep scrolling to see photos of our week of baking! Check back on the blog to see how we ice these cookies and how we plan to specially box these up for our closest friends and family!

RUGELACH

BUTTERBALLS

CUCCIDATI

LEBANESE

PEANUT BUTTER BLOSSOMS

GUIGUILENA

SHORTBREAD

ITALIAN WHITE

ITALIAN CHOCOLATE

PIZZELLES

CUT-OUTS

SPRITZ

BISCOTTI

Don’t forget to subscribe and follow us on Instagram so you don’t miss any of the rest of our 12 Days of Christmas posts! 📸: @allinaandmarreana

With love,

In case you missed it…

Day 1: Wrap It Up

Day 2: O Christmas Tree

Day 3: Hot Cocoa Bombs

Day 4: Perfect Anise Biscotti

Perfect Anise Biscotti

Perfect Anise Biscotti

Today for the fourth day of our Christmas series we are sharing a recipe that has been in our family for years! This is our tried and true anise biscotti recipe. It is the perfect addition to your morning coffee or your holiday cookie tray.

We hope you give this recipe a try for your friends and family this holiday season! If you do, please let us know what you think!

RECIPE:

Keep scrolling to see photos of the steps that go into making these classic Italian cookies!

We love the addition of the red cranberries, it’s a festive touch that makes all the difference on our cookies trays!

We always be sure to bake on parchment paper for baking ease!

After the first bake, we cut carefully when they are still warm to get them ready for the second round in the oven!

Golden brown goodness after toasting!! Yum!

Don’t forget to subscribe and follow us on Instagram to see more photos of the 12 Days of Christmas!

📸: @allinaandmarreana

With love,

In case you missed it…

Day 1: Wrap It Up

Day 2: O Christmas Tree

Day 3: Hot Cocoa Bombs

Hot Cocoa Bombs

Hot Cocoa Bombs

For the third day of our 12 Days of Christmas we decided to try a viral holiday trend going around this year — hot cocoa bombs! If you have been scrolling Tiktok or Instagram this season there is no doubt you’ve come across a video of these adorable chocolate balls!

It was hard to resist making these treats this year, especially with our extra time…there is nothing better than curling up at night with a hot cup of cocoa and turning on our favorite holiday movies!

For anyone who doesn’t know, hot cocoa bombs are put in a mug, you pour boiling milk over them and watch them come to life! Once they open up, out pours hot cocoa mix, marshmallows, crushed peppermint or any other sweet you would like to mix in!

After trying this holiday sweet trend, we think the most important thing is to have fun with this! It’s okay if it’s a little messy and not perfect! We had the most fun drizzling different colored chocolate and sprinkles on top! They look adorable and festive!

The most satisfying part of this was finally pouring hot milk over the hot cocoa bombs and seeing them come to life! See the video below!

We hope you try this with your close friends and family this holiday season! Maybe even add it on to your list of classic holiday trends like making gingerbread houses!

Don’t forget to subscribe and follow us on Instagram so you don’t miss any of our 12 Days of Christmas posts!

📸: @allinaandmarreana

With love,

In case you missed it…

Day 1: Wrap It Up

Day 2: O Christmas Tree

Red Pepper Romesco Pasta

Red Pepper Romesco Pasta

This pasta dish is such a special staple in our house! We’re not sure how it came about, but it’s been developed over the years and we have truly perfected it!

This red pepper romesco sauce is the perfect way to switch up a Sunday dinner and try something new. It works well with all types of pasta and is gluten free! We served ours with homemade pizza bread, a small antipasto and a fresh toss salad!

Ingredients:

(Serves 6)

-2 12 or 13 oz. jars of roasted red peppers

-4 cloves of garlic

-1/2 small onion

-1 to 1 1/2 lbs. pasta

-2 cups frozen peas

-3 tbsp olive oil

-1/4 cup pecorino romano

-2 tsp garlic powder

-1/3 cup heavy cream

-salt

-pepper

-parsley

-fresh basil

Instructions:

1. Mince your garlic and finely chop your onion. Add to medium skillet over medium heat with olive oil. Keep moving around to ensure it doesn’t burn!

2. Roughly chop roasted red peppers. Once onion becomes translucent, add peppers to pan. Sauté all together for 5-7 minutes.

3. Transfer everything from pan into a food processor (if you don’t have a food processor, a blender would work as well!) Pulse until a smooth consistency. Return to pan over low heat.

4. Bring large pot of water to boil. Generously salt. Toss pasta. When your pasta has about 5 minutes left, toss frozen peas into the same pot to finish cooking along with the pasta. Reserve a mug of pasta water from the pot, then strain and set aside.

5. Add a splash of your hot pasta water to your heavy cream to temper it. Then add heavy cream, salt, pepper, parsley, and garlic powder to sauce. Stir and let it come to a simmer.

6. Combine pasta and peas with the red pepper sauce. Add cheese, fresh basil and a drizzle of olive oil or a splash of pasta water to incorporate.

7. Serve and enjoy!

Keep scrolling to see more pictures and details of how we created this dish!

Roughly chop your roasted red peppers before adding to the pan.

Put the sauce base in the food processor and return to pan, slowly stirring in the heavy cream!

Putting the frozen peas right in the boiling water is the best short cut! It starts to flavor them and leaves them perfectly cooked! We love the addition of peas to this dish, but they could be easily swapped or left out.

We kept our sides simple — homemade pizza bread and antipasto! (and of course a toss salad we forgot to photograph!)

Finished result! Beautiful!

Please let us know if you tried this and what you thought! Leave a comment and see more photos on our Instagram! 📸: @allinaandmarreana

Happy Cooking!

Summer Pineapple Chicken Kabobs

Summer Pineapple Chicken Kabobs

We were laying by the pool today and both had a craving for pineapple! We sat and talked and came up with the perfect way to incorporate our craving for fruit with our dinner for the evening. The perfect sweet and savory Summer kabobs!

Pineapple, peppers, onions and perfectly marinated chicken, slightly charred over rice! We paired with a Summer mandarin orange salad, topped with Hawaiian roll croutons!

Ingredients:

3-4 large boneless skinless chicken breasts

1 pineapple

2 sweet onions

4 red bell peppers

2 cups white rice (chicken broth optional)

Marinade:

3 tbsp rice vinegar

2 tbsp ketchup

2 tbsp soy sauce

1/4 cup pineapple juice

1/4 cup brown sugar

fresh cracked pepper

garlic powder

olive oil

Mandarin Orange Salad:

1 head iceberg

Half bag romaine

1 can mandarin oranges

1/4 cup slivered almonds

Handful grape tomatoes (halved)

3 Hawaiian rolls

2 tbsp butter

salt and pepper

Orange Vinaigrette:

1/4 c orange juice

3 tablespoons apple cider vinegar

2 tablespoons olive oil

1 tsp honey

Salt and pepper

Instructions:

1. Take your boneless skinless chicken breast and cut into small chunks, lay in dish you will marinate in. Cover the chicken in a couple of tablespoons of olive oil, generously coat in garlic powder and fresh cracked pepper.

2. Make the marinade. Whisk in a small bowl rice vinegar, pineapple juice, ketchup, brown sugar, and soy sauce. Pour over chicken, reserving about 1/3 cup of the marinade. Tightly cover and let sit for 2-4 hours (longer the better!)

3. Cut up red peppers into big chunks. Toss peppers with olive oil, salt, pepper and garlic powder. Set aside. Cut up onions and set aside.

4. Assemble kabobs, put peppers, onion, marinated chicken and pineapple on your skewerers. Grill kabobs 20 mins, flip half way. You want a nice char on them!! 3-4 minutes before taking off, brush remaining marinade on top!

5. Make two cups white rice according to box. Optional: substitute water for chicken broth. Top with parsley and set aside.

6. Turn oven broiler on high. Roughly rip apart Hawaiian rolls on baking sheet with aluminum foil. Melt butter in a small bowl. Brush each piece of roll with butter. Sprinkle with salt and fresh cracked pepper. Put in oven for one to one and a half minutes. Keep a close eye on them so they don’t burn! Flip over and put in an additional one to one and a half minutes.

7. Chop head of ice berg. Combine with romaine. Half tomatoes, add to salad with mandarin oranges and slivered almonds.

8. Make vinaigrette. Whisk the orange juice, apple cider vinegar, honey, salt and pepper together. Slowly stream in the olive oil and continue to whisk until all combined. Add vinaigrette to salad, toss & top with Hawaiian roll croutons!

9. Serve your grilled pineapple chicken kabobs over rice and the delicious mandrian orange salad on the side.

Keep scrolling to see more pictures of the steps it took to create this dish!

We started by cutting our chicken breasts into chunks and pre-measuring our ingredients for the marinade!

Prep your veggies and get them ready to assemble!

Salad time! These Hawaiian roll croutons will be the main event for many salads to come!

Tip: Soak your skewers to prevent burning and breakage on the grill!

Rice paired perfectly with the sweet and sticky chicken kabobs!

Picture perfect! Not only do these kabobs look beautiful, they are delicious!

Happy Cooking!

Don’t forget to follow us on Instagram to see more behind the scenes looks at our daily cooking!

📸: @allinaandmarreana

When Life Gives You Lemons…Make Pasta

When Life Gives You Lemons…Make Pasta

Sometimes all it takes is a simple object to inspire a dinner menu. We found this lemon printed table cloth and matching napkins and knew we had to have them for our outdoor table. The table came first, then came the pasta! In the summer we love adding lemon to transform traditional dishes. This pasta features ricotta, lemon juice, lemon zest and toasted breadcrumbs — the ultimate summer dish! It’s light and perfect to eat while dining outside. Keep reading below to see pictures of our lemon themed table and menu!

Pasta Limoné with Zucchini

Ingredients:

-1 pound pasta (pictured: malfadine)

-2-3 zucchini

-1 lemon (juice and zest)

-2 cloves garlic, minced

-lots of olive oil

-kosher salt

-fresh cracked pepper

-1 tbsp fresh parsley

-1/3 cup Pecorino Romano (plus more to top)

-1 cup Ricotta

-1/2 cup reasoned breadcrumbs

Instructions:

1. Wash and thinly slice zucchini. We like using a kitchen mandolin for uniform thin slices (click here for our favorite one!)

2. Heat a large skillet over medium heat. Add olive oil and minced garlic to pan. Let simmer. Add sliced zucchini to pan. Season with salt and pepper. You may need to re-season with more salt and pepper as the zucchini cooks, go by taste! Approx. 15-20 minutes. You want your zucchini to cook down and change color.

3. Bring a large pot of water to boil. Once bubbling, salt water and toss pasta. Reserve 1 cup pasta water.

4. Mix ricotta in small bowl with half of the Pecorino and parsley. Set aside.

5. Put a small pan over low-medium heat. Put seasoned breadcrumbs in, moving occasionally, toasting. They should get golden brown, approx. 5 mins. Remove from heat and set aside.

6. Strain pasta and put directly in the skillet with sautéed zucchini. Add lemon juice (start with half and adjust to taste), red pepper flakes, remaining Pecorino Romano, 1/4 cup ricotta, and reserved pasta water. Stir over low heat. This should combine so your pasta has a glossy, garlicky, cheesy coating.

7. Once thickened, remove from heat and serve. Top pasta with a sprinkle of Pecorino, dollop of ricotta, lemon zest, and breadcrumbs!

7. Enjoy!

As a side we tossed fresh asparagus with olive oil and our favorite grill seasoning, garlic and parmesan. Simply grill and serve!

And finally, our show-stopping dessert…a deliciously simple olive oil cake!

This cake has underlying hints of fresh lemon and orange. It’s topped with a heavy dusting of powdered sugar and a sprig of rosemary. Perfection!

We hope this inspires you to take advantage of warm weather and fresh fruit — it is the perfect way to take a simple Summer dinner to the next level! 🍋

Don’t forget to follow us on instagram for more behind the scenes looks at our daily cooking! 📸: @allinaandmarreana

Happy Cooking!

Pork Meatballs Over Lemon Arugula Salad

Pork Meatballs Over Lemon Arugula Salad

When you think of meatballs, you probably think of them over pasta, today we want to share with you a different and delicious way to enjoy meatballs!

There are countless ways to make meatballs, from different ground meat combinations, to cheeses, to every seasoning in between. We promise once you try this meatball recipe you will want to serve them any time you make sauce!

This is an all pork meatball, with a special addition of ricotta cheese that makes them irresistibly moist and flavorful! We serve over arugula tossed in a lemon vinegarette…perfection!

Ingredients:

Meatballs

-1 pound of ground pork

-1 egg

-1/3 cup panko breadcrumbs (gluten free)

-3 tbsp milk

-1/2 cup ricotta cheese

-1/2 cup Pecorino Romano

-1/2 tsp kosher salt

-1/2 tsp garlic powder

-1/2 tsp onion powder

-generous amount of parsley

-1/4 cup olive oil

Sauce

-A jar of your favorite marinara, or whip up a quick sauce of your own! (one of our favorite ways to make a quick sauce is listed in our Baked Ziti Melanzana post!)

Salad

-1 bag baby arugula

-pinch of kosher salt

-fresh cracked pepper

-olive oil

-white balsamic vinegar

-lemon juice

-fresh shaved Pecorino Romano

Instructions:

1. In a small bowl combine panko, milk, egg, ricotta, and Pecorino Romano. Stir to combine, letting the breadcrumbs soak up some of the liquid.

2. Add the mixed wet ingredients to the ground pork. Add salt, garlic powder, onion powder, and parsley. Gently mix the meat with your hands.

3. Heat a medium skillet over medium heat. Add olive oil to cover the bottom of the pan. Roll meatballs using 1-1 1/2 tbsp of meat.

4. Add the rolled meatballs to the heated olive oil, browning each side. Keep them moving for an even color. About 8-10 minutes. Once done, remove from heat and set aside.

5. Either make your sauce or heat your marinara. Once heated, add the meatballs to the sauce. Let simmer for 15-20 minutes.

6. For the salad, toss the arugula with olive oil, white balsamic vinegar, salt, pepper and lemon juice to taste. This is all preference for how you prefer your salad to taste!

7. Finally, separate the arugula onto plates, being generous. Top with 2-3 meatballs and shave fresh Pecorino Romano to finish.

8. Enjoy!!!

See below for more photos of the steps that went into making this twist on traditional Italian meatballs!

Ingredients ready to go, all pre-measured!

Meatballs coming together!

Browning the meatballs! Wish you could smell how amazing these did when they hit the pan!

Arugula, olive oil, kosher salt, fresh lemon, and a big hunk of Pecorino Romano.

Shave the Pecorino, it looks beautiful and really adds to the taste!

Buon Appetito!

Please let us know if you try this recipe!

Follow us on Instagram for an inside look on our daily cooking!

@allinaandmarreana 📷

Happy Cooking!

(Recipe inspired and modified by Giadzy.com)

Make Your Own Greek Bowls

Make Your Own Greek Bowls

This is the perfect dinner when you are craving something light and want to utilize your grill in the Summer months!

We love doing dinners where we can be creative and make our own personalized dishes tailored to our tastes!

Here we make our own version of greek grilled chicken bowls! See below for our favorite toppings and how we like to construct this dinner!

We like to start our bowls with rice! This can be white rice, greek rice, or rice pilaf (as shown here). We prefer our mom’s famous rice pilaf when making our greek bowls! It adds another dimension of flavor that is second to none!

We then like to add lettuce (here we did chopped iceberg), grilled chicken (marinated in our favorite greek dressing), roasted red & orange peppers (with olive oil and garlic), chopped tomatoes, cucumbers, mozzarella, and feta!

We always top off our bowls with extra greek dressing!

Here is a photo of our dad’s finished creation! Some additional toppings not pictured above were: banana peppers, cherry peppers, and Allina’s homemade tzatziki! Keep reading for the recipe!

The homemade tzatziki is the perfect addition to these bowls!

This truly is a delicious dinner to have with your family on a warm Summer night! We hope you try this one at home and add on your own twist with different toppings…the possibilities are endless!

Tag us on Instagram if you try this:

@allinaandmarreana 📷

Don’t forget to subscribe so you never miss a post!